


Fishing Tool Selection in Workover Operations: A Complete Field Guide
Fishing operations typically account for 15–20% of workover NPT across global oilfields. A common misconception is that fishing is simply "running a tool downhole to retrieve the fish." In reality, successful retrieval depends far more on accurate downhole diagnosis than tool selection.
Misjudging fish top conditions, applying excessive weight, or forcing retrieval can lead to stuck tools, secondary fish creation, and even well abandonment. This guide systematically breaks down the working principles, selection logic, and field operation standards of conventional fishing tools, providing actionable best practices for oilfield operators worldwide.
1. Before Running the Tool, Stop and Think
In the field, the most critical step in a fishing job often takes place before the tool is ever run in hole. At a minimum, the following questions must be answered.
- What is the fish? Tubing? Sucker rod? Coupling? Pump? Packer? Or a remnant of some downhole tool? Different fish call for entirely different tool selection strategies.
- Where is the fish top? Do not rely solely on the design depth. The actual fish depth may deviate from the original calculation, especially in cases of string parting, fish slippage, high deviation, bottomhole sand accumulation, or multiple previous interventions. Therefore, the fish top position must be progressively confirmed while running in hole by monitoring resistance, hook load, and tool depth changes.
- What is the condition of the fish top? This is the decisive factor in fishing success. The fish top may be intact, parted, burred, deformed, tilted, or sanded in. For the same tubing string, an intact fish top allows the use of a spear, while a deformed fish top may require fish dressing or washover first. When the wrong tool is chosen, the problem is rarely the tool itself—it is a misjudgment of the fish top condition.
2. Taper taps and die collars
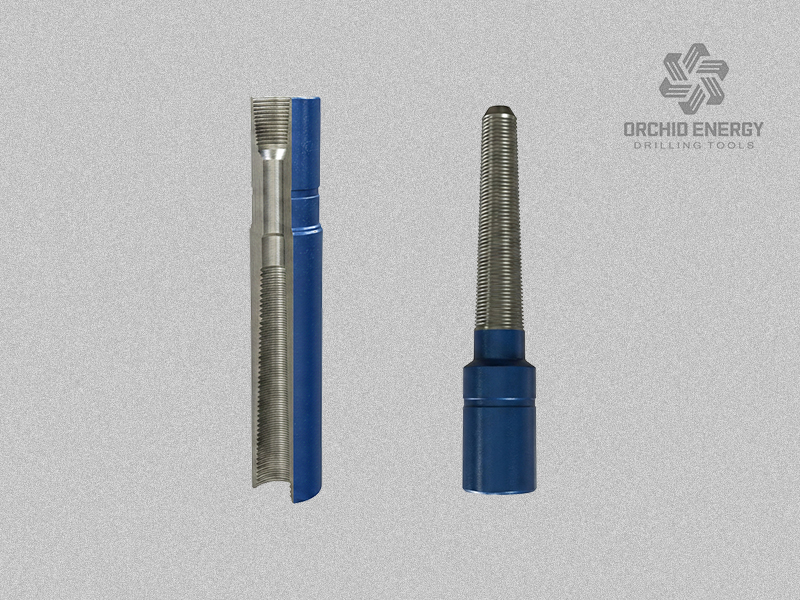
Taper taps and die collars are classic thread-cutting fishing tools. Their core principle is to cut new threads into the fish to form a rigid mechanical connection.
- Taper Tap: Cuts threads on the I.D. of the fish, suitable for tubular fish with intact bores.
- Die Collar: Cuts threads on the O.D. of the fish, suitable for fish with regular, undeformed outer surfaces.
Operation Guidelines (Baseline for Conventional Vertical Land Wells)
- Lower slowly to tag the fish top. After confirming entry, apply 20–30 kN WOB and rotate at 10–20 rpm to cut threads.
- After several turns, pull up to verify engagement. A measurable increase in hook load is the primary indicator of a successful connection.
- If engagement fails, do not apply excessive weight. Reposition and retry — forced weight will damage the fish top and eliminate all thread-cutting potential.
Stuck Pipe Handling After Thread Engagement
- Assess connection integrity through hook load, torque, and force changes, never overpull.
- If jarring and string manipulation fail to free the fish, perform a planned back-off operation. Monitor all parameters continuously to prevent string parting.
3. Slip Spears
Slip spears are the most widely used internal fishing tools. They grip the inner wall of the fish via expanding slip elements.
Operation Standards:
- Record baseline hook load before approaching the fish top — this is the reference for all subsequent judgments.
- Do not force the tool when encountering resistance. Rotate slowly and make small vertical adjustments to center the tool and guide it into the fish bore.
- After running in, pull up gradually to expand the slips and engage the wall. A hook load increase is the primary indicator of successful engagement.
- Verify engagement with a light load first, then increase pull force gradually. Sudden heavy loading can cause slip slippage.
4. Releasing Spears
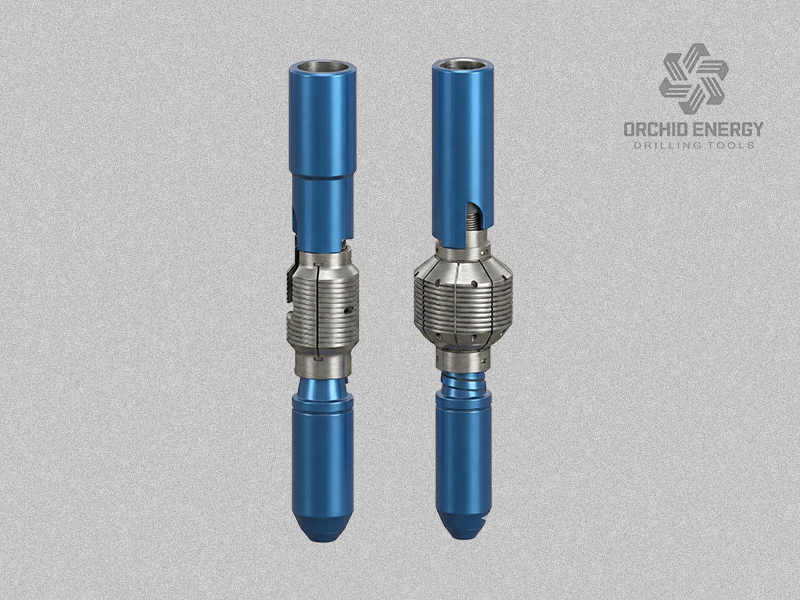
The greatest risk in fishing is not failing to catch the fish, but catching it and being unable to release the tool when stuck — creating a more complex downhole incident. The core value of releasing spears is the ability to safely disengage and retrieve the tool if engagement fails or the string becomes stuck.
Key Operation Points:
- Run in hole with circulation and rotation to clean debris from the fish top and centralize the tool.
- A hook load decrease typically indicates tool entry into the fish. Rotate per the operating procedure to complete the engagement sequence.
- Pull up slowly to verify engagement before initiating full retrieval.
- Release Mechanism Caution: Release direction and sequence vary by manufacturer and tool design. Always verify engagement direction, release direction, load rating, and rotation limits against the official technical manual before running the tool. Never operate based on experience with similar tools alone.
5. Back-Off Spears
When a fish is fully stuck and cannot be freed by overpull, a back-off spear is the primary solution: first establish a reliable connection, then back off the stuck string in sections for staged retrieval.
Operating Principles:
- After confirming secure engagement, perform back-off operations at the designed torque value.
- Monitor hook load and torque throughout the process. A gradual decrease in both parameters usually indicates successful thread disengagement.
- Never exceed torque limits. Boundaries are defined by drill string torsional strength, tool load rating, and tubular connection strength. Over-torque can part the drill string, create a secondary fish, and make downhole conditions uncontrollable.
6. Tubing Coupling Spears
Tubing coupling spears are designed specifically for retrieving tubular fish with couplings, gripping at the internal coupling shoulder.
Key Operation Points:
- Lower with rotation and circulation to guide the tool into the coupling profile.
- A sharp hook load decrease combined with a pump pressure increase is the typical signal of tool entry into the coupling.
- Verify engagement with slow upward pull; never jerk the string.
- Confirm engagement through a combination of tool penetration, hook load, pump pressure, and rotation behavior. Do not mistake mechanical obstruction for successful engagement.
7. Hydraulic Spears
Hydraulic spears engage via hydraulic actuation, with pump pressure as the primary feedback signal. They are especially useful in deep wells or with light fish where hook load changes are difficult to detect.
Key Operation Points:
- At design depth, activate the pump and build pressure to the trigger value, then maintain pressure.
- Pull the string up slowly and assess engagement status through hook load changes.
- If a single verification is inconclusive, repeat the pressure release-engagement cycle for multiple confirmations.
- Final confirmation must combine pump pressure, hook load, and tool penetration — never rely on a single signal.
8. Retrievable Slip-Type Overshot
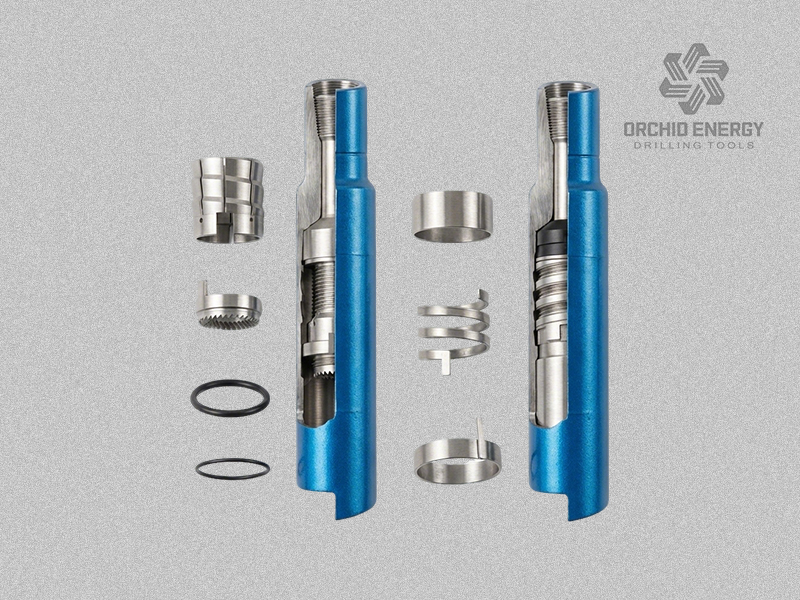
Overshots are external fishing tools that enclose the fish from the outside. They are suitable for fish with regular OD and no severe deformation.
Operation Standards:
- Approach the fish top with rotation, circulation, and slow lowering to guide the fish into the overshot bore.
- Fish entry is typically accompanied by a hook load decrease and a slight pump pressure rise.
- Pull up slowly to lock the slips against the fish OD. A hook load increase confirms successful engagement.
- For release, strictly follow the jar + rotate + pull release sequence specified in the manufacturer's manual.
9. Window-Type Overshot
The key advantage of side-door overshots is their ability to handle fish tops with minor deformation or deviation, creating entry space where standard overshots cannot engage.
Key Operation Points:
- Circulate to clean the fish top, then lower slowly with rotation.
- A significant hook load decrease is an initial indicator of entry into fishing position.
- Pull up slowly to verify engagement. With light fish where load changes are subtle, make repeated vertical passes and judge through resistance patterns and penetration depth.
- Distinguish carefully between “tagging the fish top” and “fully enclosing the fish” — these are distinctly different states. Confirm full engagement before pulling out of hole.
10. Washover Operations
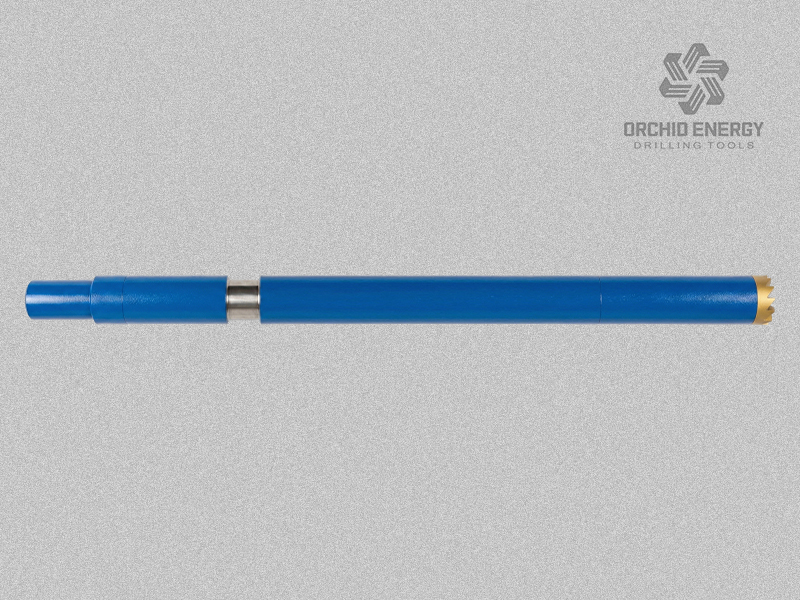
Washover is often misunderstood as "grinding away material around the fish". Its actual purpose is to clean sand bridges, remove obstructions, dress fish tops, and increase annular clearance — creating conditions for subsequent fishing. In many cases, washover is the first step of a fishing plan, not a last-resort remedy after failed attempts.
Baseline Operating Parameters:
- Standard washover: 10–20 kN WOB, 50–100 rpm.
- Actual parameters must be adjusted dynamically based on formation hardness, annular clearance, well deviation, and fluid carrying capacity.
- Flow rate is the critical control parameter. Insufficient flow rate causes cuttings accumulation, creating a vicious cycle of increasing stickiness as milling progresses.
11. The Most Common Washover Mistake: Stopping Circulation with the Tool on the Fish
Stopping pumps to make a connection is standard field practice, but the most common mistake is leaving the washover tool pressed against the fish top when circulation stops.
Correct Operating Procedure:
- Before stopping pumps for a connection, pull the string up to fully lift the washover tool off the fish top.
- Circulate thoroughly to ensure all downhole cuttings are carried to surface.
- Keep the string moving while pumps are off to prevent cuttings from settling and burying the tool and fish. Cuttings settlement sticking significantly increases operation complexity and cost.
12. Washover in Open Hole: Do Not Chase Footage
Open hole washover carries significantly higher risk than cased hole operations. Formation collapse, key seats, and hole restrictions can all cause tool sticking.
Core Operating Principle: Short intervals, frequent verification.
- After each short milling interval, pull up and work the string to check for normal torque, pump pressure, and hook load.
- Resume operation only after confirming no sticking or abnormalities.
- Never push for continuous footage to save time. If the tool becomes irretrievably stuck, the cost far outweighs any time saved.
13. No Milling Footage? Do Not Simply Add Weight
No footage during milling is a critical anomaly signal, usually accompanied by chatter, erratic torque, back-spinning, and pump pressure fluctuations.
Common Causes:
- Improper milling tool selection or worn cutting structure
- Change in fish material properties
- Poor cuttings removal leading to downhole accumulation
- Eccentric wear, with the tool not properly contacting the fish
Handling Principle
Diagnose the root cause first, then adjust parameters or change tools accordingly. Blindly increasing WOB will only accelerate tool wear, damage casing, and worsen the problem.
14. Protect the Casing During Milling
Milling operations must never prioritize penetration rate over casing integrity. Casing damage — wall thinning or wear-through — costs far more to repair than the original fish incident.
Protective Measures:
- Optimize the BHA with stabilizers to centralize the tool and reduce eccentric wear.
- Control WOB and rotation speed to avoid severe lateral vibration.
- Monitor torque and pump pressure continuously to detect early signs of abnormal wear.
Core principle: The goal of milling is to remove the fish, not to damage the casing in the process.
15. The Signals That Truly Matter in Fishing Operations
Fishing operations cannot be judged by "caught or not caught" alone. Four core parameters must be monitored in real time to assess downhole conditions:
1) Hook Load
- Decrease: Tool entering the fish or encountering obstruction
- Increase: Successful engagement or stuck pipe condition
- Load change alone is not a conclusion — it is a clue that must be interpreted with other parameters.
2) Torque
- Torque trends indicate thread cutting progress, sticking severity, and back-off success.
- Sudden torque spikes or drops are critical anomaly signals requiring immediate attention.
3) Pump Pressure
- Key reference for hydraulic tools, overshots, washover, and milling.
- Pressure rise can indicate tool positioning, annular plugging, or cuttings accumulation — interpretation depends on operational context.
4) Surface Returns
- Iron filings, metal fragments, sand, rubber, and sludge are the most direct feedback of downhole conditions.
- Unusual metal fragments often indicate abnormal downhole wear or parting.
16. How to Quickly Select a Conventional Fishing Tool?
Use this decision logic to quickly identify initial tool options. Final plans must be confirmed with complete downhole data:
- Intact fish ID → Prioritize spears
- Regular fish OD → Prioritize overshots
- Fish top suitable for thread cutting → Taper tap / Die collar
- Target is a coupling → Coupling spear
- Hydraulically actuated engagement required → Hydraulic spear
- Slightly irregular fish top → Side-door overshot
- Fish caught but stuck → Back-off tools + freeing procedures
- Insufficient annular clearance → Washover operation
- Severely deformed fish top → Mill and dress fish top before fishing
Remember: The fishing solution is determined by fish condition, wellbore geometry, and operational constraints — not just the type of fish.
17. Conclusion: In Fishing Operations, the Most Expensive Thing Is Not the Tool—It Is the Wrong Decision
A widely accepted principle in the workover industry holds: One wrong trip costs far more than just time.
An ineffective run means rig time, personnel standby, fluid consumption, production deferment, and unpredictable downhole risks.
Professional fishing operations rely not on having more tools or taking greater risks, but on clear diagnostic logic:
Confirm the fish top before selecting tools; verify engagement with light load before full retrieval; analyze root causes before addressing sticking.
Fishing tools are only the means — downhole diagnosis is the core. Preserving fish top integrity and managing risk matter far more than rushing the operation.
Quick Link: Releasing Spear | Overshot | Taper Tap | Die Collar | Washover Pipe


